Viewing: hand lettering

Party DIY: Hand-lettered balloons

Did you see the hand-lettered balloon garland I made for Tala’s first birthday party? I wanted to write a separate post about this fun little DIY project because I enjoyed doing it so much.

DIY hand-lettered balloon garland

Aside from the balloon garland, I also hand-lettered individual balloons and floated them around the cafe. Tala is already used to hearing English, Filipino and Dutch, so I used a combination of fun party words from those three languages.

Hoera! Party balloons DIY handlettering

Hoera (pronounced hooh-rah) means hurray!

Leuk! Party balloons DIY handlettering

Leuk! is Dutch for nice, fun, or cool. The Dutch say it so often, in the beginning I was paranoid that people were being sarcastic with me.

Yehey! Party balloons DIY handlettering

We also had Super! Yay! and Yippee! And of course, I couldn’t leave out our very own Yehey!

This was so much fun for me. I’ve always loved hand lettering—just ask my high school classmates and look at my old textbooks. Plus, it’s easy! Anyone can do it and it doesn’t take much time. Here’s how to DIY your own hand-lettered party balloons.

[Read more...]

Party prep for the weekend

Tomorrow is Tala’s first birthday, and all I can say is: I’m so glad I live in a culture where the approach to birthday parties is practical and laid-back.

It’s a good way for me to ease into the world of kiddie birthday parties. I have quite a few friends with babies Tala’s age, and recently my Facebook feed has been a parade of glittery fairy costumes, elaborate theme parties and fancy home-baked birthday cakes. It’s a bit intimidating, but I have to remind myself that motherhood is not a competition, and the most important person in this equation is literally incapable of judgment.

Mama might not have a fat bank account or know how to bake, but she has pretty handwriting and is great at finding things on the Internet. That should count for something, right?

Babies and bacon!

Our plans are simple: we’ve invited friends to a “Babies & Bacon” birthday brunch for Tala at a neighborhood cafe. The cafe is very typical Dutch, so the process of “educating” them on the elements of what would be considered an American-style brunch—with bacon and Bloody Marys—has been… interesting. I’ve had to yield my ambitious plans of fluffy pancake stacks to the reality of flat, crispy Dutch pancakes; however, I’ve been assured there will be Mimosas, so I guess you win some, you lose some.

I’m off to run a few last-minute birthday errands, but I’ll be back next week with some snaps from Tala’s first birthday party. Wish me luck, and think a happy thought for Tala on her first birthday!

DIY hand-lettered Christmas cards

I always make my own Christmas cards, but after having Tala, I realized this year would be different. Nobody would care about my artistic ideas anymore—everyone just wants to see the baby!

I wanted to give the holiday photos my own unique style without going the standard “family posing under the Christmas tree” route. Inspired by this Elle UK spread featuring Michelle Williams and some cool hand-lettered script, I created my own set of hand-lettered Christmas cards using Tala’s black-and-white holiday photos.

I hope everyone I’ve sent them to has received them by now, so I can share them without spoiling the surprise!

Hand-lettered baby Christmas card

I started out with a simple “Merry Christmas!” to warm up. To soften the stark black and white photos, I decided to keep the script fun, loopy and childlike, rather than ornate or fancy.

[Read more...]

Hand lettering project: Sketches to final artwork

Yesterday, I blogged about the hand lettering class on Skillshare that’s been my main creative outlet this fall. I shared the inspiration behind the phrase I chose to work on, which was a song lyric from the ’80s fantasy film Labyrinth.

Today I want to show you how the inspiration I gathered evolved into sketches, and eventually, into a final inked drawing. Letterer Mary Kate McDevitt goes through these steps in detail and packs lots of tips and tricks into her video lessons. So I highly recommend signing up for the class if you want to learn more about the whole process!

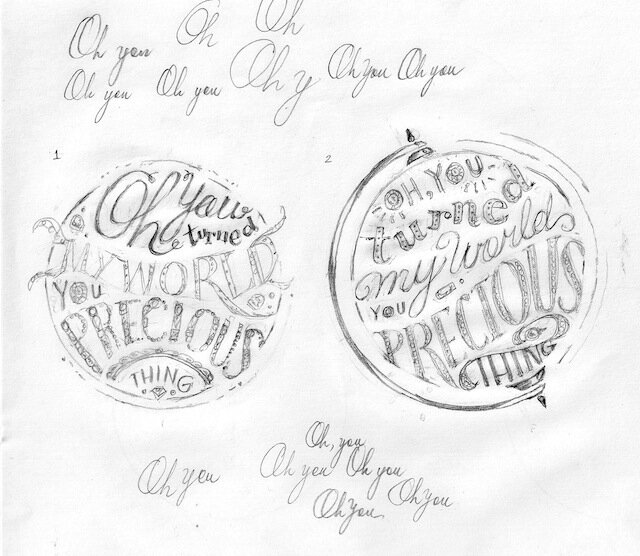
After soaking up visual inspiration, it was time to prop up my mood boards in front of me, put pencil to paper and warm up by trying out different styles of lettering.

Lettering warmups

I hadn’t drawn anything in months, so my first warmup (on the left) was painful. Personally, I found my first attempt quite atrocious. “Que horror!” I thought to myself in dismay while rubbing my aching hand. “Maybe hand lettering isn’t for me?”

But soon I discovered why it’s called a warmup—muscles need to loosen up and get used to producing letters. If you look from left to right, you’ll see my succeeding warmups improved. After a few tries, I was able to start playing around with elements from my inspiration boards, like gems, jewels and floating or tumbling letters.

Thumbnails

The next step was to sketch small, quick thumbnails to try out a few possible layouts. At this point, I decided to contain the entire phrase in a tilted globe to convey the idea of a turning world.

Rough sketches

Then I chose the most promising thumbnails to refine and develop in more detail.

Refined sketchThis was my first detailed sketch. Patience is not one of my virtues, so it still shocks me to think I spent almost three straight hours working on this—drawing, erasing and redrawing, over and over again. I like to obsess over little details (something my watercolor teacher hated), so drawing all these tiny jewels felt almost therapeutic for me.

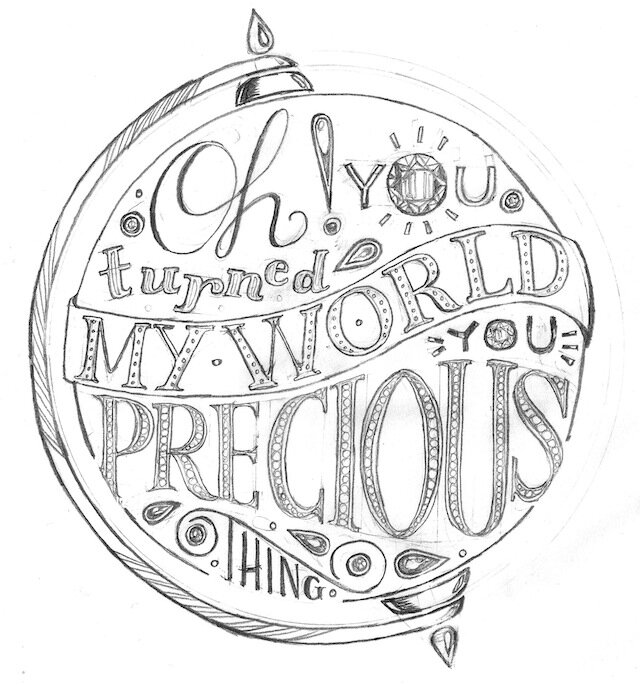
Final pencil sketchOnce I reached a refined sketch that I was happy with, I laid a sheet of tracing paper over it and retraced it (no way was I going to draw the whole thing from scratch!). Thanks to feedback from Mary Kate and my Skillshare classmates, I knew that everything south of the banner was pretty solid—I just had to work on the top half of the globe to make the words more readable and fit together better.

After lots of trial and error, retracing and redrawing, it was finally time to commit—to do the final inking.


Oh you turned my world you precious thing final

And here it is: my final inked hand-lettered quote! I want to print it out and put it up in Tala’s room, so I’m eyeing Mary Kate’s class on how to add color, texture and finishing touches.

It all seems easy when I sum everything up in one post, but this took more effort and time than I expected—an hour here, two hours there, carved out and compounded over weeks. I wouldn’t have been as patient if I hadn’t watched the videos of Mary Kate developing her own artwork with such care and attention to detail.

What do you think of my attempt at hand lettering? I’d love to know!

Hand lettering with Mary Kate McDevitt on Skillshare

One of the things I got most excited about this fall was getting creative again. With Tala at the gastouder twice a week, I could finally carve out some precious time to reactivate the right side of my brain and work on a new project after a six month-long creative dry spell.

I thought about reviving my interest in calligraphy, but while browsing classes on Skillshare, I got sidetracked by The First Steps of Hand Lettering with freelance letterer Mary Kate McDevitt.

Reading the class description triggered flashbacks to high school, when I was obsessed with hand lettering. I would copy letters from Bibles and calligraphy books with my Pilot Tecpoint 0.5 pen. I would write out the names of my teenybopper crushes (Edward Furlong! Leonardo DiCaprio!) in my textbooks in various styles, ink staining my fingers, nose practically pressed to my desk. I knew everything about my classmates’ love lives from all the “monthsary” cards (how very high school!) and love letters they would ask me to decorate.

Lettering was fun, I was good at it, and I had totally forgotten about all of that—until now.

Turned text1

The objective of the class was to hand letter a favorite quote or phrase, and choosing one was the starting point of the entire project. I chose a lyric from Labyrinth, an ’80s classic and my favorite movie of all time. It’s from the final scene, where Sara (Jennifer Connelly) must rescue her baby brother from Jareth, the Goblin King (David Bowie! in tights!).

In eight words, this phrase captures exactly how I feel about becoming a mother. Ever since Tala came into my life, nothing has been the same. Life as I know it has changed forever; this little girl, this precious thing has turned my world.

[Read more...]