Viewing: DIY

Party DIY: Hand-lettered balloons

Did you see the hand-lettered balloon garland I made for Tala’s first birthday party? I wanted to write a separate post about this fun little DIY project because I enjoyed doing it so much.

DIY hand-lettered balloon garland

Aside from the balloon garland, I also hand-lettered individual balloons and floated them around the cafe. Tala is already used to hearing English, Filipino and Dutch, so I used a combination of fun party words from those three languages.

Hoera! Party balloons DIY handlettering

Hoera (pronounced hooh-rah) means hurray!

Leuk! Party balloons DIY handlettering

Leuk! is Dutch for nice, fun, or cool. The Dutch say it so often, in the beginning I was paranoid that people were being sarcastic with me.

Yehey! Party balloons DIY handlettering

We also had Super! Yay! and Yippee! And of course, I couldn’t leave out our very own Yehey!

This was so much fun for me. I’ve always loved hand lettering—just ask my high school classmates and look at my old textbooks. Plus, it’s easy! Anyone can do it and it doesn’t take much time. Here’s how to DIY your own hand-lettered party balloons.

[Read more...]

Hanging up the duyan

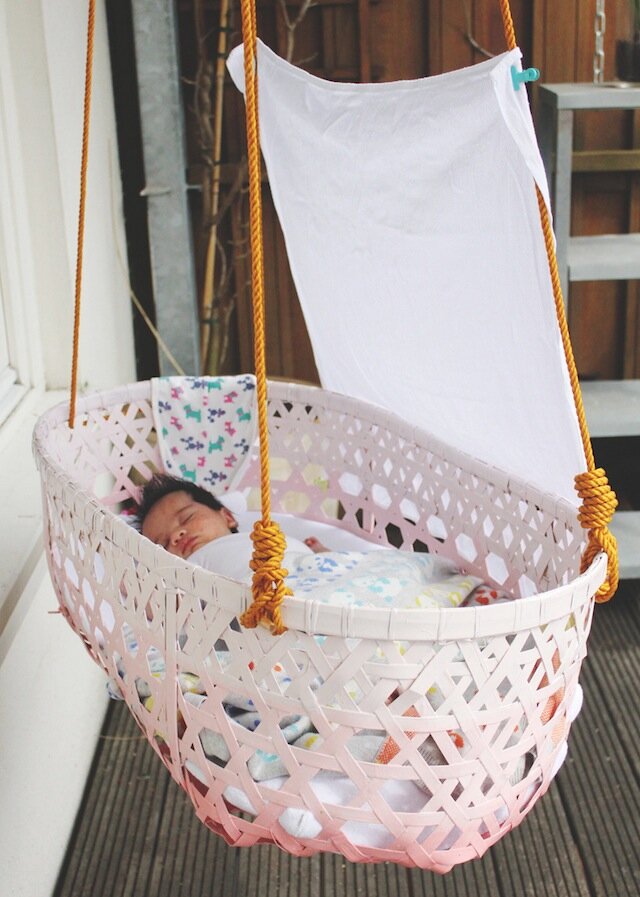
A while back, I blogged about my desire for a traditional Filipino duyanor hanging bassinet, for the baby. My mom presented me with one last Christmas, and after lots of plastic cling wrap and two plane rides, our duyan arrived safely in Amsterdam.

Plain rattan didn’t quite go with our baby room’s color scheme, so Marlon and I decided to give the traditional duyan a bit of a modern makeover. Inspired by the ombre trend, Marlon and I used leftover paint from our baby room bookshelves to create a gradient effect. We applied three shades of powdery pink, starting with the lightest shade then and blending them as we went along.

Ombre bassinet DIY

After revamping the duyan, we had to find a place for it. I wanted Tala to sleep in our room in the early months, but we didn’t have enough space to hang the duyan by the bed.

Since we had found a great deal on a second-hand Stokke Sleepi, Marlon and I decided to make that her main crib and install the duyan on the balcony instead. Luckily, our apartment’s previous owners used to hang a hammock on the balcony, and they’d left a few heavy-duty hooks in the ceiling. Marlon tapped into his inner Boy Scout to rig the rope and secure it with a few well-placed knots…

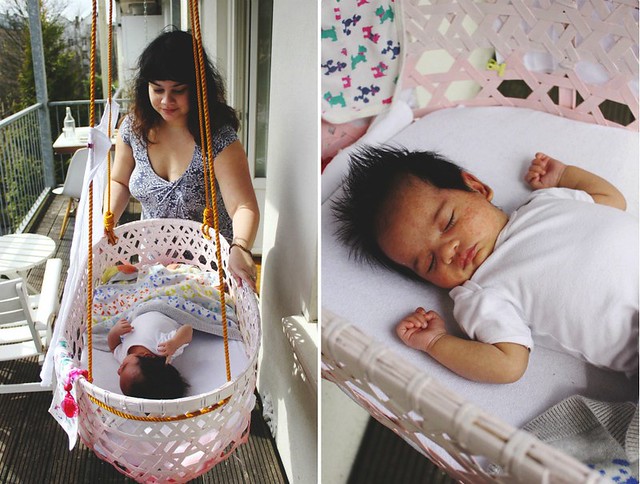
Tala sleeping in her duyan

… and voila! One fully functional duyan, ready for gentle breezes and sunny days.

With the arrival of a long-delayed spring, we’re finally getting to use the duyan. We had great sunny weather last weekend, so we put the mattress and beddings from her Stokke crib in it and put her down for a nap while we enjoyed our first al fresco lunch of the season.

Baby sleeping in duyan

So many of my baby essentials are from home. The makeshift sun shade is one of our dozens of bird’s eye cloth diapers from Landmark, and it’s secured with pastel bull clips from National Bookstore. This is a Filipino baby, after all!

Tala in her duyan

Now that we’ve managed to import and install a traditional Filipino duyan, I’d love to get more use out of it. If only it was as easy to bring over some Filipino sunshine!

Adventures in babywearing

One of the highlights of my week was learning how to carry Tala in a wrap. Babywearing, the practice of carrying a baby on the body in a sling, wrap or carrier, was something I really wanted to try.

While I was pregnant, I made my own DIY wrap inspired by the Moby Wrap. This popular brand-name wrap is basically a long piece of fabric that enables you to carry the baby close to your body, distributing weight over your back and freeing up your arms.

Making my own wrap was as simple as buying five meters of cotton jersey for €3 per meter. I didn’t even need to hem or serge it because this type of fabric doesn’t unravel. A slightly stretchy fabric like cotton jersey is suitable for wrapping newborns up to about 15 lbs; after that, more supportive fabrics like linen or cotton are recommended.

After a few false starts and many Youtube videos, I finally succeeded in putting Tala in a wrap. From then on, life with our newborn just got easier.

DIY stretchy sling for newborn

There are lots of reasons to try—and love—babywearing. According to this article, babies worn in a sling or carrier fuss less—apparently, 43 percent less than babies who aren’t.

At this age, Tala can’t handle too much stimulation; facing inwards against me, she’s less likely to be overstimulated by the outside world. Instead, she’s comforted by things she knows: the sound of my heartbeat, the smell of my skin, the closeness of my body.

She can sleep for hours this way, and sleep can only be a good thing for both mother and baby. She’ll even sleep past feeding time, only waking up for a feed if I take her out of the wrap. Bonus: she doesn’t wake up ready to attack the boob like a ravenous barracuda. That’s happened before and believe me, it’s not my favorite thing.

After nearly three weeks of having my arms full, it’s awesome to use my arms again. I’ve vacuumed, cleaned the kitchen, blogged, put on makeup, even cooked and ate meals, all while wearing Tala. Okay, I did have to pick rice out of her hair a few times. But she never seems to mind… she’s always conked out, asleep!

Finally, I just love to have her this close to me—”close enough to kiss” is the rule of thumb for front carrying. To me, it’s the closest thing to being pregnant again. It’s instinctive and natural, to be able to go about my day without having to think about how to take care of her.

Mommy and Daddy babywearing stretchy sling

As for Daddy… well, Marlon loves it! I think he was sold when using the sling gave him a few precious hours to catch up on UFC and wrestling after dinner one evening. He says we’ll keep her in it until she’s 15.

So far, I’ve only used the wrap at home. My next babywearing adventure will be stepping out with Tala in it, and getting things done in the world beyond our door. Stay tuned!

Before & after: Ikea Brimnes bed

Moving into a smaller apartment with less closet space, Marlon and I agreed that under-bed storage was a must. We looked at a couple of (mostly expensive) options until we settled on the affordable Ikea Brimnes bed, which has clean lines and huge drawers underneath.Ikea Brimnes bed with storage

Because our bedroom has limited space, we also bought the Brimnes headboard, which features a ledge and hidden shelving that we could use in place of bedside tables. Ikea Brimnes headboard

Confession: I wasn’t totally onboard with this purchase. I agreed the storage was practical, but I had an irrational, possibly hormonally-fueled distaste for those two rectangles on the headboard and footboard. “Can we please do something to cover them up?” I grumbled as we paid for our purchases at Ikea. “Okay,” Marlon said. Smart man—never disagree with a pregnant woman.

With Little Mango on the way, neither Marlon and I were in the mood for elaborate DIYs. Our solution? Wallpaper!

Piet Hein Eek headboard

Check out our quick fix and finishing touches, after the jump!

[Read more...]

From school gym to work table

At the start of the year, I decided I needed a desk. All my activities—writing for work, blogging, painting, sewing and calligraphy—took place on the dining table, and that wasn’t working for me anymore. The dining room was hard to heat in winter, so I would end up taking my laptop with me into bed… and not getting anything done! A proper desk would give me a place to build a routine around and would be great for my productivity.

I knew what I wanted: a desk of at least 1.5 meters, longer than it was deep, with space to do more than just one thing at a time. It had to have a tabletop that I wouldn’t mind staining with paint or ink, made of a warm material (no metal, no laminate). It had to have character—possibly used, preferably vintage—but clean lines. It had to be something we could repurpose as a console or buffet table if we ever needed more space. Finally, it had to be something I would want to take back with me if we ever moved back home (so no Ikea)

So I started looking around—thus the trips to Van Dijk en Ko, the IJ-Hallen flea market, and more. I constantly referred to to keep me on track. I saw a lot of desks—too deep, too low, too short, too expensive.

Then my friend Karyn, who shares my love for old and repurposed things, drove me to the little town of Baarn, 20 minutes out of Amsterdam, to visit J. van Ijken Oude Bouwmaterialen. Oude bouwmaterialenmeans old building materials, and that was exactly what Mr. van Ijken had for sale: an entire hectare of old floors, doors, windows, tiles, tubs, gates, knobs, bricks, fireplaces, you name it. All of it reclaimed from homes, ships, churches, schools, bridges, train stations and more, waiting to be found by odd people who love old things with character. Like me.

Walking into a warehouse filled with old floorboards, I was seized by a wild thought. If I couldn’t find my perfect desk… should I just build it? These are the kinds of thoughts you have after living over a year in a country and culture where everyone does everything themselves. You hear about people building their own houses from scratch and you start to think, it can’t be that hard. Can it?

This old herringbone floor from Hungary reminded me of , and inflamed my confidence. “Yes,” it whispered. “Just build it.”

Then I saw them: old hardwood planks from a Dutch school gym, for €60 per square meter. Pops of color. Lots of character. Perfect.

Finding the wood spurred me into action, and I bought a pair of clean, shiny chrome Vika Moliden legs from Ikea for €25 apiece. I got Marlon on board (you didn’t think I was going to build this all by myself, did you?), and we agreed to rent a car and come back for the planks.

The following weekend, the owner himself, Jan van Ijken, helped me select the pieces that had this old colorful tape. I’d hoped I could have the tabletop built there and just cart it home in the car, but he was very clear about that not being his business. “I supply the wood,” he said firmly and gruffly (but not rudely). He did help me cut the planks into my desired length of 1.5 meters, so thanks, Mr. van Ijken!

After purchasing some wood glue and a small power sander, it was time to build my work table.

[Read more...]

Deck the hall

… with Indian fabric, falalala lala lala!
Marlon has the habit of coming home and emptying his pockets of coins, keys and wadded-up receipts… and they end up everywhere. And I mean everywhere. Back in our Singapore condo, I’d come across coins in the bathroom, in the closet, on the kitchen counter, floor, nightstand, bookshelf, coffee tables, dining table, you name it. I went ballistic each time I found a coin. I tried putting a specially designated canister in different locations to catch them, observing where he was most likely to empty his pockets, asking him where it was most convenient for him, to no avail. 
And so I became determined to win the war against the coins and install a catch-all solution in our new home. It came in the form of a many-drawered vintage steel cabinet, from my vintage/industrial mecca Spoor 38. The cabinet had a lovely patina (a.k.a. rust), but when we moved it into the hallway it looked lost and bare. 
Then I remembered I bought some pretty paisley fabric during our honeymoon in Rajasthan. (In case you didn’t know, I’m the biggest sucker for anything with a paisley print.) It had been sitting, unused, folded quietly in a box for the last three years, waiting for its moment.

When I told my mom about this, by the way, she cackled with a triumph that was at least 24 years in the making. “See? See? Now you understand!” she cried with glee. She used to shop for fabric all the time when I was a kid, and I hated it. With a passion. Even my biggest displays of brattiness and my constant whining accusations of “You don’t even use them!” could never dissuade her from this habit. And I agreed that, yes, now I understood. (Don’t you just get the feeling sometimes that we are all turning into our mothers?)

Anyway, with several pieces of wood molding from the hardware store, some gold paint, a few nails, generous amounts of wood putty, and my trusty staple gun, Marlon and I made a “framed wallpaper” backdrop for the steel cabinet in the hallway.

And like my dining chairs and their DIY cushions, the print picks up the little bits of rust and wear on the cabinet while complementing the metal in a way that I really like. 
Those pesky coins? They end up in the drawers now, so I guess we can consider this battle won. With style. And paisley. 

Chairs from here & there

The first time I saw mismatched dining chairs was when Italianni’s opened in Greenbelt in 1996. Before that, all I had ever seen were meticulously coordinated formal dining sets. It rocked my world, and my 15 year-old self vowed to have mismatched dining chairs one day. 
Italianni’s as a design influence sounds funny and a little bit horrific now that I think about it, but it’s true. And it’s also funny that I can now say a dream has come true, since we’ve amassed an eclectic little collection of dining chairs over the last month. 
The first two dining chairs we bought were a pair of vintage metal Tolix chairs from vintage/industrial warehouse Spoor 38. I had made up my mind to get vintage bistro chairs like these, but we could only afford the one pair, and they weren’t in the best condition with large exposed screws and seat-less, thoroughly rusted bottoms. 
So last week’s DIY project was new seats for the Tolix chairs. I traced the seat shapes onto some plywood and got Marlon to cut them out with a saw. Then I staple-gunned them with foam padding from Albert Cuypmarkt and floral-print upholstery fabric from Westermarkt. I was pretty happy with the results.

I like how the orange in the print picks up the little bits of rust and wear in each chair. 
Then last Friday, Marlon called me on his way home from work. “There are people throwing away chairs on the sidewalk… and some of them are kind of nice,” he said. “Wanna come over and help me choose?” I was over there faster than you could say may pera sa basura!
My wonderful husband not only picked out a couple of nice chairs in decent condition, but he actually sat on them to prevent other sidewalk vultures from getting them. Plus, he dug up a plastic bag with five rolls of unused Laura Ashley lining papers and wallpapers. He knows me, this man!
One of the people rummaging through the chairs with us remarked, “If our mothers could only see us now!” I think my mother wouldn’t mind. I hope. 
One of our finds was this wood and steel chair. It’s surprisingly comfortable. 
It was probably some kind of old-school office chair. I’m thinking of painting the metal white…

… to go with this cafe chair. I used to see these in very old kopitiams in Singapore. 
Well, it’s not a dining chair, but I just had to have it! This cute little wooden chair will soon be reborn in  a fresh new color, maybe a bright purple or sunny yellow. 
The two “found” chairs are by no means permanent, and will likely get rotated to other parts of the house in the future. But for now, they allow us to finally put the dining room to use and take our time to find and save up for better chairs. And they’ve helped me fulfill my Italianni’s dream! Tee hee!

A dove’s tale

Last weekend, Marlon and I achieved another DIY milestone: painting the living room. This time around, we chose a totally different feel from the bedroom and went for Dove Tale from Farrow & Ball, a lilac-tinged dove gray. 
This time, it went a whole lot faster and smoother. Having lots more space to move around in made a huge difference. We were able to be more systematic and orderly about placing our “drop cloths”, which were reused cardboard boxes from Ikea and from our moving in, plus bubble wrap from a couple of furniture deliveries. Marlon had wanted to buy proper drop cloths from Gamma, but when he saw that one was €27, it was easy to sway him to adopt the cheaper more eco-friendly alternative.  

Goodbye boring white walls!

After priming the walls on Saturday morning, we let the primer dry overnight. With Farrow & Ball, primer pa lang, maganda na! That could be the seed of a winning campaign if they ever decide to venture into the Philippine market. 
Excuse the dining room mess. We had to dump everything somewhere.
We finished both coats in a record 5.5 hours, with an hour’s lunch break. We had to work a lot faster because streak marks are more obvious with a lighter color. Also, instead of painting the corners first as we did with the bedroom, we painted them last, which turned out to be a wise decision. The paint dried smooth and a lot more even this time around. “We’re getting better at this, Mrs. Plazo,” said Marlon. 
The night before we painted, I had an anxiety dream that Dove Tale turned out to be a cheap satin bridesmaid kind of lavender that Marlon hated. I still had my doubts while we were diluting the paint, but after the first coat, I decided that I loved it. And by the time we finished the second coat, I was in love… again.

So here’s the living room before, with blah flat white walls:

And after, with Dove Tale. Tadaah! I’ve been obsessing about gray walls for the last few years, so I’m ecstatic to finally have them!
It turned out to be more lilac-tinged in our living room light than the way it looks on the website, which is more brown. I’m envisioning bright yellow accents with touches of purple here and there.
We have quite a few paintings with metallic frames, which I think will work really well against the gray. I’m excited to hang them up.
Marlon thinks it looks yummy. “If we had gone any lighter,” he said, “parang sayang lang yung effort natin mag-paint.” And a few shades darker would have swallowed up the wine crates and daybed. 
So, the living room is well on its way! We’ve still got a lot to do, like hang the paintings, put books and other knickknacks inside the crates, buy an easy chair, replace the big floor pillows and add bright throw pillows to perk up the daybed. And the dining room still looks like a war zone. But for now, I’m patting us on the back and enjoying the lovely lilac hue. 

Our cobalt cocoon

A little over two weeks after Marlon and I first moved in, we’ve transformed our bedroom from this…

To this! Behold the fruit of our DIY labor!

I am in love with the color on our walls. Although the paint job is far from professional, the blue to me is completely swoonworthy. Jonel referred to the color, to my mild horror, as Ateneo blue. I joked to Marlon that we should start calling our bedroom The Blue Eagle Wing.

Then I saw that it was the same blue that both Blogger and use. I’m sure if I really put my mind to it, I can come up with a dozen companies or brands that use this color. But why would I want to do that when I am already so perfectly happy with it?

The bedroom is about 75% done. The floor lamp and bedside table are temporary—the latter was actually bought for the balcony. I already ordered bedside tables from Gewoon Chic, a great Dutch home webstore that I just discovered, which will be delivered today. Then all we need are bedside lamps, plus a chest of drawers for Marlon’s clothes (since I’ve pretty much taken up most of the closet space).
Oh and speaking of closets… check out Marlon’s pride and joy! He is over the moon seeing the results of his assembly job, and so am I.
Having decided on a palette of cobalt blue and white with metallic accents, I made the bed with this white cutwork bedspread from Jaipur, one of the stops on our honeymoon in Rajasthan. It used to be on our daybed in the living room.
We bought half a dozen freaking bedspreads from this one salesman who dazzled us with the whole Bollywood song and dance. He described his wares as “sho shoft, sho fabuloush” sho often that it shtuck—Marlon and I now refer to the bedspreads as fabuloush, as in “We need to wash the fabuloush.” I think we were mired in credit card debt for the better part of a year, but we sure had a blast. And now that we have a home worthy of the fabuloush, they’ve turned out to be some of my most treasured purchases.
At night, with yellow light, the blue loses some of its cobalt zing, but still remains lovely and rich and enveloping.

I thought about repainting my dresser in the same glossy white as the bed, but that would make everything too matchy-matchy. I totally got the matchy-matchy gene from my mother, but I’m doing my best to suppress it. So it will remain a soft matte ivory.

Marlon is as in love with the blue as I am, but says it’s made it harder for him to wake up in the mornings. I have no such problem. In fact, since we moved back into the newly repainted bedroom, I’ve been waking up every morning at 7.30 a.m. to have breakfast with him before he goes off to work. And if you know me, you’ll know how abnormal that is for me. Maybe it’s the effect of having a home that inspires and excites me… a home that I can’t wait to wake up in every day!

Do it yourself

Today’s post is brought to you by the letters D-I-Y!
It’s no accident that the word tipidity contains those letters, lol. Marlon and I were forewarned by Europe-based friends that we would have to get very handy around the house very fast if we wanted to save money, and it’s true. Nothing makes you realize how spoiled we Asians are like furnishing a European house on a, well, Asian budget. 

There was no way we were carting these Ikea Pax closet elements home with us on the train (taxi? what taxi? We’re in Europe, remember?), so we splurged on delivery for less than €50. But when we were told that hiring someone to assemble them would cost at least €250, Marlon decided to take things into his own hands… literally.

He bought his first power drill and spent the better part of a Sunday assembling our closets. We had door-less closets for about a week and a half, because attaching the doors would require the three closets to be screwed together into one large unit. And that would make it hard for us to move the closet around when we painted the bedroom.

Assembling the closets brought out Marlon’s inner handyman. He would do simple things before like change bulbs and hang frames, but often left anything more complicated to hired help—which is no longer an option here. He’s gotten a lot more confident using power tools and gets really enthusiastic about my ideas for DIY projects.

What a revelation this whole process has been. Suddenly it’s like all of life’s questions can be resolved with a power drill. Now we can look at a piece of furniture or fixture that we like and go, “Madali lang yan! Kailangan lang natin mag-drill.” Which is how two ladders and a few wooden planks almost became a bookshelf… almost. But that’s another story.

One of his mini-projects was installing a bar with S-hooks (again, thank you Ikea) for our kitchen utensils, right beside the stove. I love this because it frees up so much drawer space and makes everything easy to grab. 

Our biggest DIY project to date has been the repainting of the bedroom. Both of us had decided early on that we were done with living in white boxes, a fate that most renters are doomed to endure. Luckily, our landlord agreed to let us paint the walls, provided that we return them to white if he should so decide at the end of our lease.

At €45 per hour for a professional painter, for a job that would take at least eight hours, it was easy for Marlon and I to decide to go DIY. He did some research on painting equipment and techniques online, then bought everything we needed at Gamma, Holland’s version of Home Depot.

Having saved on labor, we then decided we could splurge on paint. Well, I decided. My obsessive online research had led me to Farrow & Ball paints, and somewhere between their poetic product names and and rich hues, I fell in love. I’ve always, always wanted an intense color on my bedroom walls, so I was immediately drawn to Drawing Room Blue. Marlon was totally on board with it; I think he was just glad I didn’t want anything too girly.

At €119 per 5L can (one would cover our 30 sqm walls), plus another €109 for the recommended primer and undercoat, we could definitely have gotten something a lot cheaper, but you can’t fight love.

The actual painting took up an entire weekend, starting with an hour on Thursday evening to move out all the furniture and mask the ceiling, floor and windows with tape. Friday night was spent slathering on the primer, which took about three hours.

Teka, puro si Marlon pala ang nasa pictures. Baka isipin ninyo na sitting pretty lang ako. Ako kasi ang taga-document at tagaluto. Pero nagtatrabaho ako, promise.

Using the rollers was super fun and made our job easier than expected. We got shaggy lambswool rollers for €2 each; if not for the Interwebz, we probably would have gotten cheapo foam rollers na parang pangkulot, lol.

We left the primer to dry all of Saturday and returned to do the first and second coats of paint on Sunday morning. Halfway through the first coat, Marlon and I found ourselves thoroughly pleased with our choice of paint. The best thing about Farrow & Ball paints are that they are water-based. No thinner, no awful fumes, and so easy to clean up paint splatters! Just a damp rag and a little elbow grease, perfect for DIY newbies like us.
And the color… the color!!! Deeply pigmented, with a soft sheen… *colorgasm* I suggested diluting the second coat slightly, which made it even faster to paint on. The second coat totally smoothed out the slight imperfections and uneven-ness of our first coat. 

By the time we were done on Sunday night, Marlon and I were grinning like idiots. We had spent a total of 12 hours, shelled out €263 (for the primer, paint and delivery), and saved €540 on labor for a paint job that was on track to make our bedroom look and feel like a million bucks. And we had just gotten our first taste of the DIY euphoria that money just can’t buy.

Next up: the new and improved bedroom… revealed!