Viewing: furniture

Before and after: Nursery

It’s been a while since I blogged about the baby room, so I figured: why not do a nursery update? Quite a few things have changed since my last post about Tala’s room, and I’d love to show them to you.

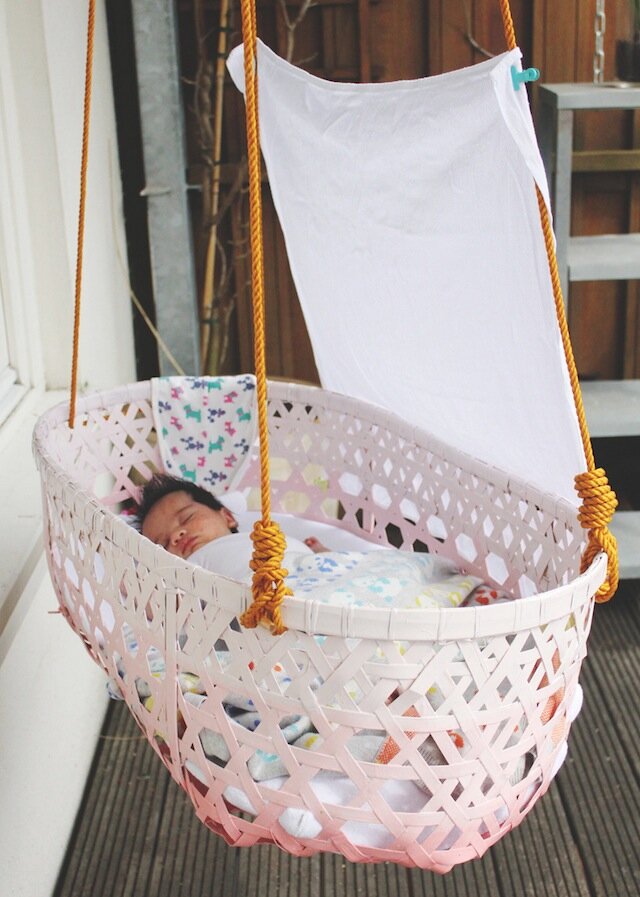
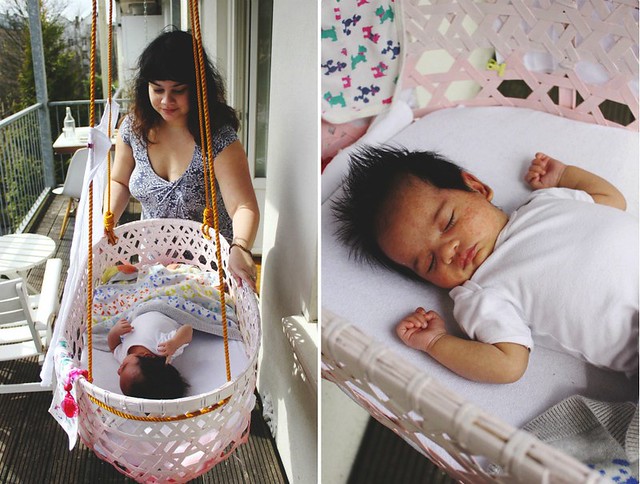
The biggest change in the nursery has been the crib. From its previous incarnation as a bassinet…

Nursery before with Stokke bassinet

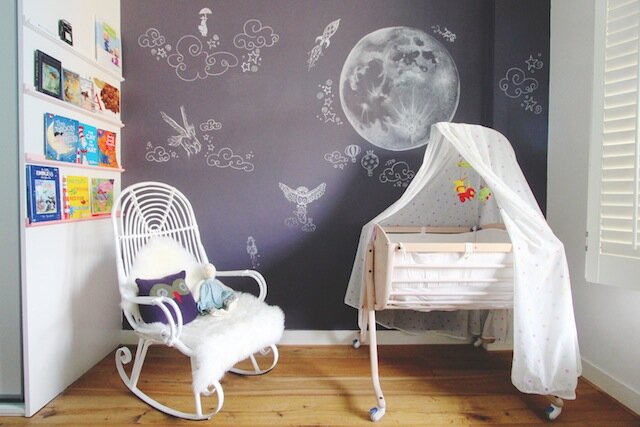
… our Stokke Sleepi had to be reconfigured into its crib form when Tala started sleeping in her room at three months. Have I said how much I love this bed and that it can grow with our baby?

Stokke Sleepi crib with mosquito net

Tala also outgrew her duyan, which now serves as a storage basket under the crib. And yes, that is a kulambo! The mosquito net became absolutely essential in the summer. Who knew that mosquitoes were part of the Amsterdam canal house dream? Though the weather has turned, we’ve kept the mosquito net up—because as Invader Stu has so perceptively pointed out, mosquitoes here don’t leave, they just put on an extra scarf.

More details and pictures after the jump!

[Read more...]

Guest post at Eclectic Trends

Today, you can find me over at Gudy Herder’s blog Eclectic Trends with a guest post!

Store Without A Home Haarlemmerdijk window

Gudy is a stylist, visual merchandising trainer and ceramic lover with impeccable taste. So when she asked me to do a shop visit as a guest post, I decided to feature a beautiful interior and living store right in my own neighborhood. Store Without A Home is full of dreamy, whimsical things for the home, located on a fantastic shopping street just a few minutes’ walk from my own home.

Here are some more images that didn’t make the cut for the final blog post. For the full tour of this lovely store, head on over to Gudy’s blog!

Store Without A Home Haarlemmerdijk dresser table

Store Without A Home Haarlemmerdijk ceramics

Store Without A Home Haarlemmerdijk neon Dream On

It was my first time to approach a store about taking photos for a blog post. I was a little nervous at first, but shop owner Janwillem was so kind and welcoming (and so very particular about placing things just so!). It was fun and I’m glad Gudy gave me the opportunity.

I’m curious: is this the kind of post you’d like to see more of on Currystrumpet? Let me know!

What’s in the box?

I’ve been trying to fight it, but the takeover of our home by baby stuff has begun. Recently it became apparent that I needed somewhere to put Tala during the day that wasn’t the couch, floor or bassinet. Enter The Box.

Tala's box

The box, or playpen as it’s known elsewhere, seems to be a Dutch baby essential. After being offered several boxes, I finally gave in and took one sight unseen. Luckily, it fits in nicely with the warm wood and eclectic style of our living room. Sigh of relief.

Confession time: despite my resistance to baby stuff outside Tala’s room and ours, I actually had fun furnishing the box.

[Read more...]

Hanging up the duyan

A while back, I blogged about my desire for a traditional Filipino duyanor hanging bassinet, for the baby. My mom presented me with one last Christmas, and after lots of plastic cling wrap and two plane rides, our duyan arrived safely in Amsterdam.

Plain rattan didn’t quite go with our baby room’s color scheme, so Marlon and I decided to give the traditional duyan a bit of a modern makeover. Inspired by the ombre trend, Marlon and I used leftover paint from our baby room bookshelves to create a gradient effect. We applied three shades of powdery pink, starting with the lightest shade then and blending them as we went along.

Ombre bassinet DIY

After revamping the duyan, we had to find a place for it. I wanted Tala to sleep in our room in the early months, but we didn’t have enough space to hang the duyan by the bed.

Since we had found a great deal on a second-hand Stokke Sleepi, Marlon and I decided to make that her main crib and install the duyan on the balcony instead. Luckily, our apartment’s previous owners used to hang a hammock on the balcony, and they’d left a few heavy-duty hooks in the ceiling. Marlon tapped into his inner Boy Scout to rig the rope and secure it with a few well-placed knots…

Tala sleeping in her duyan

… and voila! One fully functional duyan, ready for gentle breezes and sunny days.

With the arrival of a long-delayed spring, we’re finally getting to use the duyan. We had great sunny weather last weekend, so we put the mattress and beddings from her Stokke crib in it and put her down for a nap while we enjoyed our first al fresco lunch of the season.

Baby sleeping in duyan

So many of my baby essentials are from home. The makeshift sun shade is one of our dozens of bird’s eye cloth diapers from Landmark, and it’s secured with pastel bull clips from National Bookstore. This is a Filipino baby, after all!

Tala in her duyan

Now that we’ve managed to import and install a traditional Filipino duyan, I’d love to get more use out of it. If only it was as easy to bring over some Filipino sunshine!

Before & after: Ikea Brimnes bed

Moving into a smaller apartment with less closet space, Marlon and I agreed that under-bed storage was a must. We looked at a couple of (mostly expensive) options until we settled on the affordable Ikea Brimnes bed, which has clean lines and huge drawers underneath.Ikea Brimnes bed with storage

Because our bedroom has limited space, we also bought the Brimnes headboard, which features a ledge and hidden shelving that we could use in place of bedside tables. Ikea Brimnes headboard

Confession: I wasn’t totally onboard with this purchase. I agreed the storage was practical, but I had an irrational, possibly hormonally-fueled distaste for those two rectangles on the headboard and footboard. “Can we please do something to cover them up?” I grumbled as we paid for our purchases at Ikea. “Okay,” Marlon said. Smart man—never disagree with a pregnant woman.

With Little Mango on the way, neither Marlon and I were in the mood for elaborate DIYs. Our solution? Wallpaper!

Piet Hein Eek headboard

Check out our quick fix and finishing touches, after the jump!

[Read more...]

Before & after: Kitchen

My last before-and-after of the week is the room that didn’t need much fixing up: our kitchen. Here’s what it looked like before we moved in…

Kitchen before1

and after.

Kitchen after1

Even though we didn’t have to do much with our kitchen, it’s become the most hardworking space in our house. We cook and eat at home a lot (and some of our meals can get pretty elaborate!), so our kitchen countertop is pretty full. We’re using this space just as I pictured it: Marlon cooking while I work at my desk by the window, the two of us spending time together even while doing different things.

[Read more...]

Before & after: Entryway

Compared to our previous apartment, our new home has a smaller entryway. I actually don’t mind; I think if we had a bigger hallway, it would just collect more junk! Here’s how the hallway looked before we moved in…

Hallway before

and what it looks like now.

Hallway after

For such a small space, we managed to fit in quite a few things, including some of our favorite paintings and knickknacks.

[Read more...]

Before & after: Living room

Though I had hoped Little Mango would come early, I have to admit there are quite a few pluses to her taking her sweet time. One of them is having the luxury of easing into our new home—figuring out storage, shifting furniture around, and putting some essentials into place. For a while, it seemed the configuration of our home was changing every day, but Marlon and I have finally settled into a layout that we like.

So here’s a little before-and-after to show you how we’ve traded the pristine emptiness of a new apartment…

Living room1-before

for something a little more lived in… a little more “us.”

Living room1-after

[Read more...]

Making it our own

It’s been over two weeks since Marlon and I moved into our new apartment. Every day is an opportunity to chip away at the chaos with little tasks, like buying toilet roll holders, as well as big ones, like assembling the most complicated sofa bed ever (Ikea PS 2012, I’m looking at you).

Though the list of tasks seems endless, none of it feels like a chore. Instead, they feel like the movements of our small family squirming into place—a turn here, a wiggle there, until everything fits just right. It’ll take a while, but in the meantime, every day I see our home starting to take on the little personal touches that make it ours. It’s a subtle, but wonderful satisfaction.

I loved how the previous owners decorated the place, with clean lines, a spacious feeling and minimal clutter. But as much as we wanted to do the whole minimalist Scandinavian thing, color has made its place in our home. I can’t stop it; it’s in our personality.

IMG_8142

Books and art… can’t have a home without those. None of our paintings or prints are in their final place yet, though.

IMG_8169

By the way… Marlon painted these!

We’re reconfiguring some things, like the old crates that used to be a TV console and are now hallway storage…

Hallway storage from crates

and finding new places for others. For example, my desk used to be in the guest room, but now sits between the living and dining spaces. There’s more pressure on me to keep it neat!

IMG_8165

[Read more...]

From school gym to work table

At the start of the year, I decided I needed a desk. All my activities—writing for work, blogging, painting, sewing and calligraphy—took place on the dining table, and that wasn’t working for me anymore. The dining room was hard to heat in winter, so I would end up taking my laptop with me into bed… and not getting anything done! A proper desk would give me a place to build a routine around and would be great for my productivity.

I knew what I wanted: a desk of at least 1.5 meters, longer than it was deep, with space to do more than just one thing at a time. It had to have a tabletop that I wouldn’t mind staining with paint or ink, made of a warm material (no metal, no laminate). It had to have character—possibly used, preferably vintage—but clean lines. It had to be something we could repurpose as a console or buffet table if we ever needed more space. Finally, it had to be something I would want to take back with me if we ever moved back home (so no Ikea)

So I started looking around—thus the trips to Van Dijk en Ko, the IJ-Hallen flea market, and more. I constantly referred to to keep me on track. I saw a lot of desks—too deep, too low, too short, too expensive.

Then my friend Karyn, who shares my love for old and repurposed things, drove me to the little town of Baarn, 20 minutes out of Amsterdam, to visit J. van Ijken Oude Bouwmaterialen. Oude bouwmaterialenmeans old building materials, and that was exactly what Mr. van Ijken had for sale: an entire hectare of old floors, doors, windows, tiles, tubs, gates, knobs, bricks, fireplaces, you name it. All of it reclaimed from homes, ships, churches, schools, bridges, train stations and more, waiting to be found by odd people who love old things with character. Like me.

Walking into a warehouse filled with old floorboards, I was seized by a wild thought. If I couldn’t find my perfect desk… should I just build it? These are the kinds of thoughts you have after living over a year in a country and culture where everyone does everything themselves. You hear about people building their own houses from scratch and you start to think, it can’t be that hard. Can it?

This old herringbone floor from Hungary reminded me of , and inflamed my confidence. “Yes,” it whispered. “Just build it.”

Then I saw them: old hardwood planks from a Dutch school gym, for €60 per square meter. Pops of color. Lots of character. Perfect.

Finding the wood spurred me into action, and I bought a pair of clean, shiny chrome Vika Moliden legs from Ikea for €25 apiece. I got Marlon on board (you didn’t think I was going to build this all by myself, did you?), and we agreed to rent a car and come back for the planks.

The following weekend, the owner himself, Jan van Ijken, helped me select the pieces that had this old colorful tape. I’d hoped I could have the tabletop built there and just cart it home in the car, but he was very clear about that not being his business. “I supply the wood,” he said firmly and gruffly (but not rudely). He did help me cut the planks into my desired length of 1.5 meters, so thanks, Mr. van Ijken!

After purchasing some wood glue and a small power sander, it was time to build my work table.

[Read more...]